This page may contain affiliate links. Please read my disclosure for more info.
Nest is much easier to use than old-school thermostats, but no device is perfect. In this Nest thermostat troubleshooting guide, we’ll address the most common problems with Nest thermostats, including battery, Wi-Fi, and sensor issues.
1. Nest Thermostat Flashing Green Light
A blinking green light indicates that your thermostat is receiving a Google software update. This is completely normal, and it should only take a few minutes to complete.
However, there may be a problem if the light continues to blink after several minutes or if you see a steady green light instead of a flashing light. If that happens, try the following fix:
- Remove your Nest thermostat from the base.
- Line up the pin connector and place the Nest back on its base. You should hear a clicking sound if the alignment is correct.
- Wait for the thermostat to come online again.
The software update may run again at that point, but the steady green light should be gone.
2. Nest Thermostat Blinking Red Light or Low Battery
When your Nest’s battery is low, you’ll see some combination of the following signals:
- A flashing red light
- A low battery message on the screen
- A blank screen
- A home symbol on the screen
Your Nest should recharge itself from your HVAC system wiring. If your system has a common wire (C-wire), then there shouldn’t be any problem.
However, in systems without a C-wire, the Nest can only charge itself when the heating or cooling system is actively running. In the next section, we’ll go over the steps you can take if your Nest isn’t charging itself.
3. Nest Thermostat Battery Won’t Charge
Your Nest can only charge itself in one of two ways:
- Through the C-wire.
- By diverting energy while your HVAC system is running.
The first thing we’ll need to do is check whether your system has a C-wire.
- Remove your Nest thermostat.
- Look for a wire attached to a terminal labeled C. Usually, that wire will be blue.
- If there is a C-wire, make sure it’s connected properly to the terminal.
- Return the thermostat to the wall.
Since the C-wire is the preferred power source for Nest, a loose C-wire can cause the charging process to fail. If you tightened the C-wire during the above steps, give the system some time to charge before proceeding with your troubleshooting.
If your system doesn’t have a C-wire or if it was already securely attached, you may need to charge your battery manually. The Nest Thermostat E and 2nd- and 3rd-gen Nest Learning thermostats can be charged using a micro-USB cable. For a 1st-gen Nest Learning Thermostat, you’ll need a mini-USB cable instead.
- Remove your thermostat from the wall.
- Plug a micro-USB or mini-USB cable into the port on the back of the thermostat.
- Connect the USB cable to a standard wall charger (like a phone charger) and plug it into the wall.
- Wait about 2 hours for your Nest to charge.
- Disconnect the cable and return your thermostat to the wall.
That should solve your Nest charging problems. However, the problem may return if you don’t have a C-wire. We’ll tackle some longer-term fixes in the next section.
4. Nest Thermostat No Common Wire
Nest thermostats recharge themselves best through a common wire (C-wire). Whether they can get enough energy without a C-wire depends on how you run your AC and heat.
If your Nest doesn’t have charging issues, you don’t need to do anything. Your Nest must be getting enough juice on its own.
But if your Nest battery frequently runs low, you should consider installing an add-a-wire accessory to your system. They are a cheap, easy way of—as the name implies—adding a wire to existing HVAC systems.
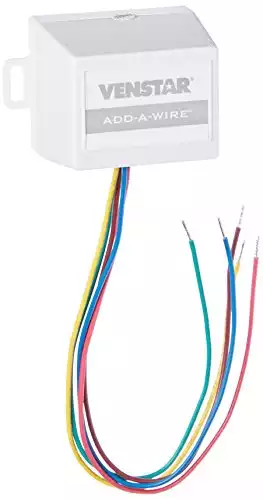
Alternatively, you could replace your Nest with an Ecobee system. Unlike Nest, Ecobee thermostats all include an adapter system for systems without a C-wire. But buying a whole new system is a pretty expensive fix compared to the add-a-wire accessory.
5. Nest Thermostat Delayed
When your Nest thermostat says delayed, it is telling you that the system is underpowered. This often happens when Nest is run without a C-wire.
This problem can go away on its own. However, it’s a good indicator that you should take a look at the add-a-wire accessory we discussed above. Your heating and cooling habits probably aren’t providing the power that Nest needs to survive without a C-wire.
6. Nest Thermostat Cycling On and Off
Nest thermostat short cycling, that rapid on-and-off behavior, can be caused by a range of issues with your HVAC system or Nest settings. Many of these issues are also accompanied by strange sounds such as clicking, thumping, or chattering.
Sometimes, this is caused by power issues, especially if your system doesn’t have a common wire (C-wire). If you’re not sure whether your system has a C-wire, check the section above. You may need to install an add-a-wire accessory.
Other common reasons for short cycling include:
- Changes in the room temperature, which you can check through the energy history in your Nest app.
- Poorly connected wires behind your Nest display.
- An HVAC system that is in need of maintenance.
7. Nest Thermostat Orange Light
As with the red light, an orange blinking light usually means that your Nest is low on battery. You can let it attempt to recharge on its own or follow the above instructions for manually charging your thermostat using a USB cable.
8. Nest Thermostat Yellow Light
This issue is specific to the European version of the Nest thermostat. A flashing yellow light means that your Nest isn’t able to connect to Heat Link, a device that connects European Nest models to heating systems.
With the Nest Thermostat E, you can click the button on the Heat Link to get its status. Then, just check your Nest app or the thermostat display for an error code or message.
You can also press the Heat Link button a second time to manually activate or deactivate the heat. This is a handy workaround if you can’t quickly fix your Nest system.
Most connection problems between Heath Link and Nest should resolve on their own. You may need to press the Try Again option on the thermostat screen to start that process.
If you get an error code in your app or display, check it against the Nest help codes list or contact Nest support.
9. Nest Thermostat No Power to RH Wire
When there is no power to your Nest’s Rh wire, it will show an E74 error code on the display, and your system will fail to turn on. The most common causes of this problem are:
- A tripped breaker
- A loose Rc or Rh wire
- A blown fuse in your air handler
You should start by checking your breaker box for any tripped breakers. Just flip the breaker off and back on if it’s in the tripped position.
You can check the wires by removing the Nest thermostat display from the wall. Depending on your system, there may be two wires going to Rh and Rc or a single wire (often with a jumper wire connecting the two terminals). Make sure the wire or wires are connected securely in place, then put the display back.
Finally, you may need to take a look at the control unit fuse on your HVAC system. There’s a white, u-shaped wire inside the fuse. If that wire is broken, the fuse is blown.
Fuses are color-coded to indicate their rating. Make sure you replace your fuse with one of the same color. You likely want to get an HVAC technician to aid you in this, particularly since a blown fuse could indicate a deeper problem with your system.
10. Nest Thermostat Won’t Connect to Wi-Fi
The Failed to connect message or error codes M21 and M22 all mean that your Nest can’t connect to your Wi-Fi network. The problem could be with your thermostat or with your Wi-Fi network, so we’ll try a few fixes for each.
- Restart your Nest thermostat by navigating on the display to Settings -> Reset -> Restart.
- Reset Your Nest network settings by going to Settings -> Reset -> Network.
- Restart your Wi-Fi network by unplugging the router, waiting 30 seconds, then plugging it back in.
Give each of those fixes a chance to resolve your network problem before moving on. Interference problems are the next most likely culprit, especially if you’ve been adding more items to your network. Try shutting off devices and—if possible—moving the nest and router closer together to see if that fixes the connection issue.
If you have recently changed your Wi-Fi network or replaced your router, you should check the recommended Nest Wi-Fi settings to make sure everything is set up correctly.
Some Nest features work without Wi-Fi, so don’t worry too much if your network doesn’t come on immediately. But the real power of a smart thermostat requires an internet connection.
11. Nest Thermostat Temperature Wrong
There are a few reasons why your Nest thermostat temperature may be different from your home’s actual temperature. First, though, let’s make sure we’re looking at the correct temperature on the display.
There are two temperatures shown on the Nest display. The big one in the middle is your set target temperature. The actual room temperature is shown at the edge of the display.
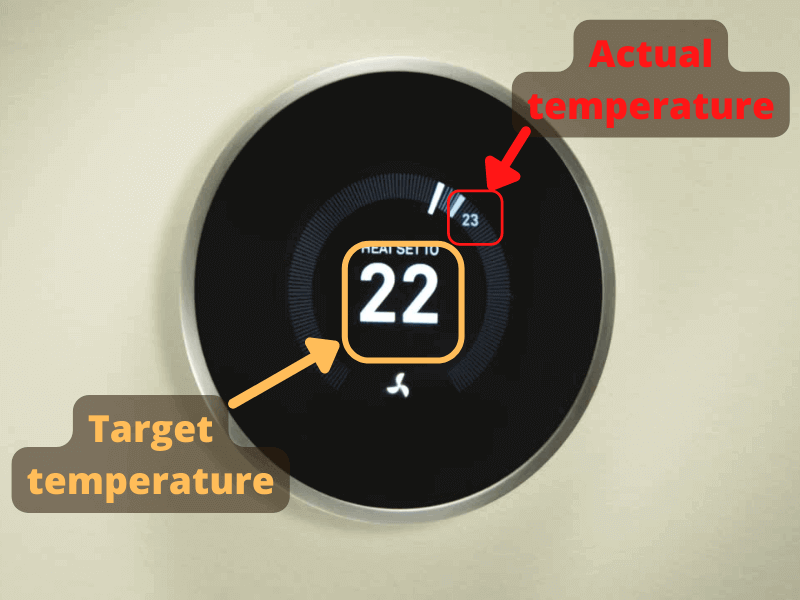
Now, let’s talk about why the actual temperature may not match your home’s real temperature.
Your thermostat can only read the temperature where it is located. Temperatures in other areas of your home may be significantly different. Adding a Nest temperature sensor to your system can help if you have a large home or if your Nest is located in a particularly hot or cool area of your home.
Your actual temperature can also fluctuate outside of the set temperature band for a few reasons.
- Your thermostat is catching up to a recent temperature change.
- The thermostat’s built-in delay is saving you energy by not immediately responding to a minor temperature change.
- Your thermostat and temperature sensor (if you have one) are reporting different temperatures.
12. Nest Thermostat Blowing Hot Air on Cool
As with many Nest problems, blowing hot air on cool or cool air on hot is usually caused by a wiring issue. Specifically, it usually means that your system has a heat pump, but you’ve wired it to the conventional system row.
There’s a great Google support article that walks you through:
- Identifying whether you have a heat pump system.
- Running diagnostics on your thermostat.
- Changing the Nest thermostat wire settings
- Checking the status of your wires.
Rather than recreating those steps here, I suggest that you check out their guide.
If you do have a conventional heating system rather than a heat pump, you should check that the wires are properly connected. Your HVAC system may be in need of maintenance.
What’s Next?
Nest’s error codes and app will help guide you through most of your smart thermostat troubles. They’re a lot easier to fix than an old dumb thermostat, even if they do have more features that can break.
If Nest just isn’t meeting your needs, you should check out Ecobee’s smart sensors, which are a huge step in smart thermostat tech for big homes. If you’re triggering smart plug devices off temperature changes, a common practice for saving energy with smart plugs, improving your thermostat is a key first step.
|
|
|
|
N/A
|
$34.99
|
$49.99
|

Zachary has spent 12 hears in the tech industry focusing on automation, analytics, and cybersecurity. His passion is tech education; he uses his industry expertise and STEM PhD to break down complicated concepts into simple step-by-step guides. When he’s not writing or coding, you can find him binging anything Star Trek or Marvel or reading far too many sci-fi novels.
My nest thermostat is approximately 4 yrs old. the thermostat is suddenly signaling the heat and AC at the same time. A HVAC professional had to disconnect the heat in my AC unit. please advise if Nest will provide a new thermostat.
I’m not affiliated with Nest, so I can’t say for sure. But there’s no harm in contacting them and asking.
Can the battery on my nest go bad after several years and fail to charge? Have a blinking red light despite the system shutting down to “ charge the battery “
How do you change the battery?
Any battery will go bad after enough recharges.
Some Nest Thermostat batteries are replaceable, and Google provides instructions for replacing them here: https://support.google.com/googlenest/answer/10119271?hl=en.
However, if the batteries that came with the system are rechargeable, you probably have the Nest Thermostat E or Nest Learning Thermostat. Unfortunately, there is no way to replace the battery on those units.