This page may contain affiliate links. Please read my disclosure for more info.
Voice controls aren’t enough; your smart home needs to be truly automated. In this guide, you’ll learn how to make Alexa schedule lights to turn on or off at a specific time. As a bonus, I’ll even toss in some tricks for having your lights turn on when you enter a room or turn off when you leave home.
If you’ve already installed your bulb and connected it to Alexa, you can skip to step 3 below.
1. Purchase and Install Your Smart Lights
Most smart light brands are compatible with Alexa, but be careful if you are buying a lesser-known brand. These common brands are all fully compatible with Alexa:
You can buy from Amazon’s Works With Alexa lighting section to make this process easier. For most smart homes, Philips Hue is the best option, but WiZ is great if you want a budget alternative.
Before you can use your lights with Hue, you’ll need to install them in a light fixture. Follow the instructions that came with your bulb for downloading the company’s app and syncing the bulbs with it. That step is typically necessary for Alexa to recognize the bulb.
Alternatives to smart bulbs
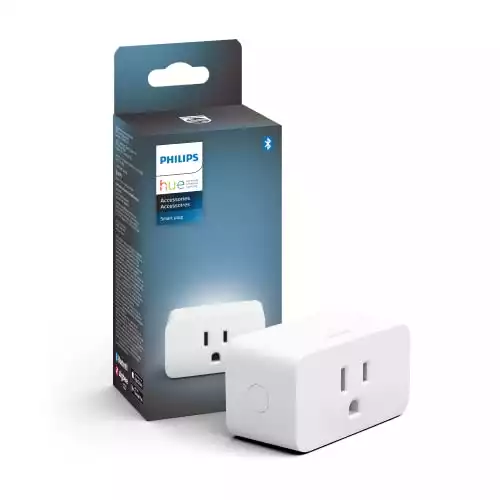
Instead of using smart bulbs, you can use a smart plug to control your dumb light bulbs.
A smart plug might be a good option if you need an atypical bulb size or shape. Or if you already have, for example, holiday string lights that you want to schedule without having to replace the entire setup.
Keep in mind, though, that you’ll only be able to turn your lights on and off using a smart plug. You won’t be able to dim them or change their color like you can with most smart bulbs.
2. Connect Your Lights to Alexa
For this next step, we’re going to go over to the Alexa app, where you’ll find brand-specific instructions for adding your lights to Alexa. If you bought WiZ lights, feel free to check out my guide to connecting WiZ lights to Alexa instead.
- Open the Alexa app.
- Go to the Devices tab.
- Click the add new device icon, the ‘+’ in the upper-right corner of the screen.
- Select Add Device.
- Select Light
- Select the brand of your smart bulb.
Follow the instructions on that screen. In most cases, it will just tell you to add the bulb to the brand’s app, as we already did, and to click the Next button. This will typically install the brand’s skill in your Alexa account.
If you want to control multiple lights with a single schedule, you’re going to want to group them together in the Alexa app. You’ll find the group settings under the Devices tab.
3. Create Alexa Routines for Your Lights
Now, for the actual scheduling. We’re going to use Alexa routines to turn your lights on or off at specified times. Routines are Alexa’s version of automations.
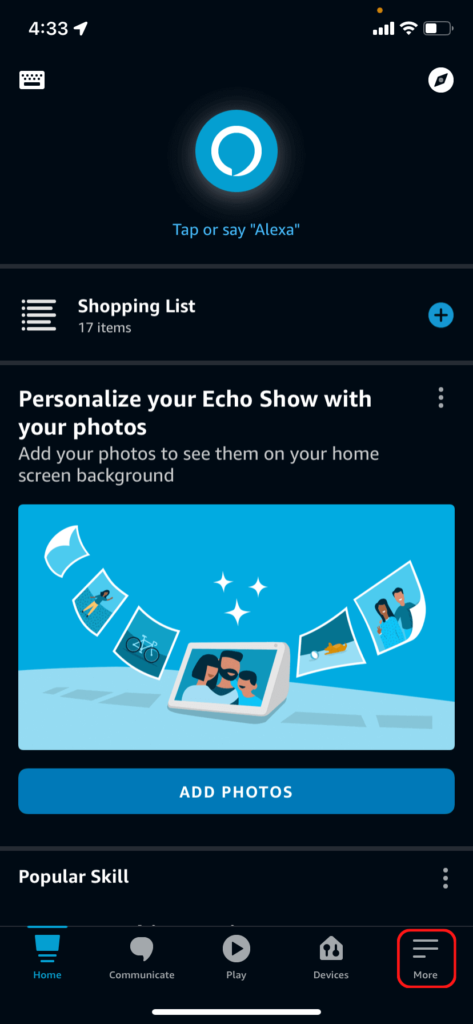
- Open the Alexa app.
- Go to the More tab.
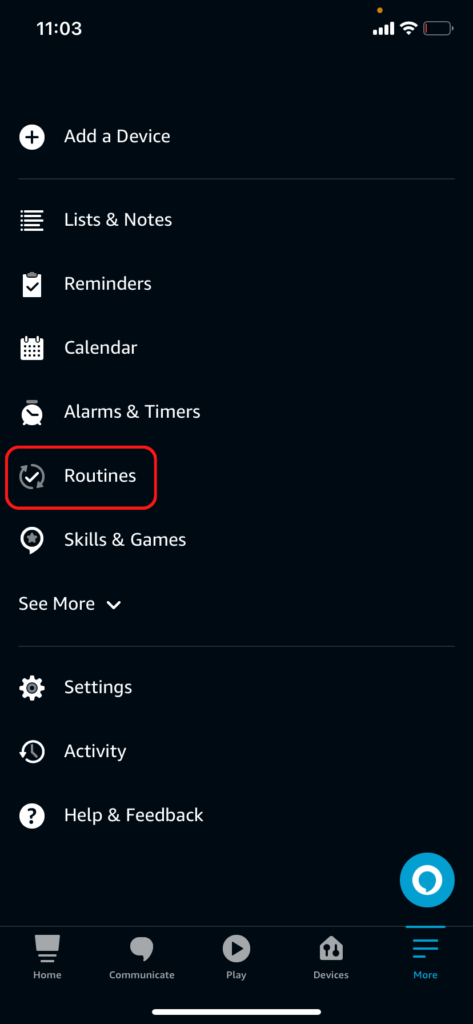
- Click Routines.
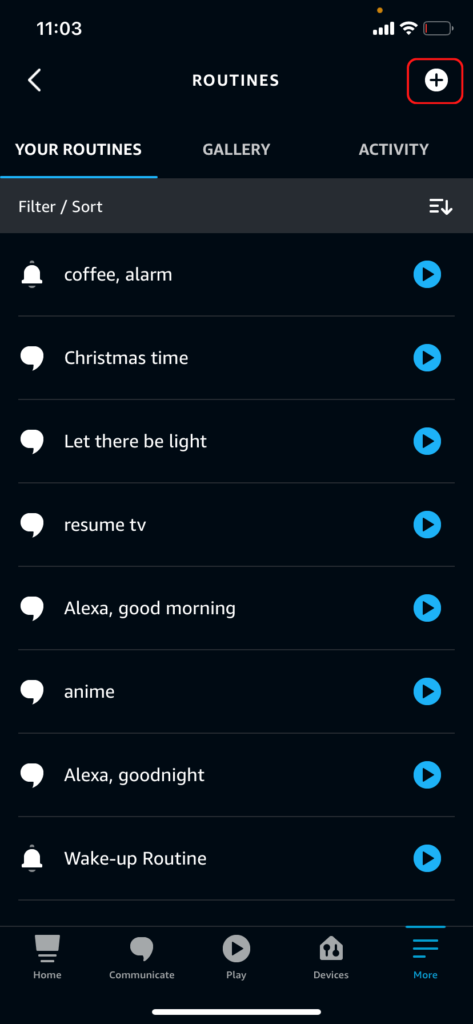
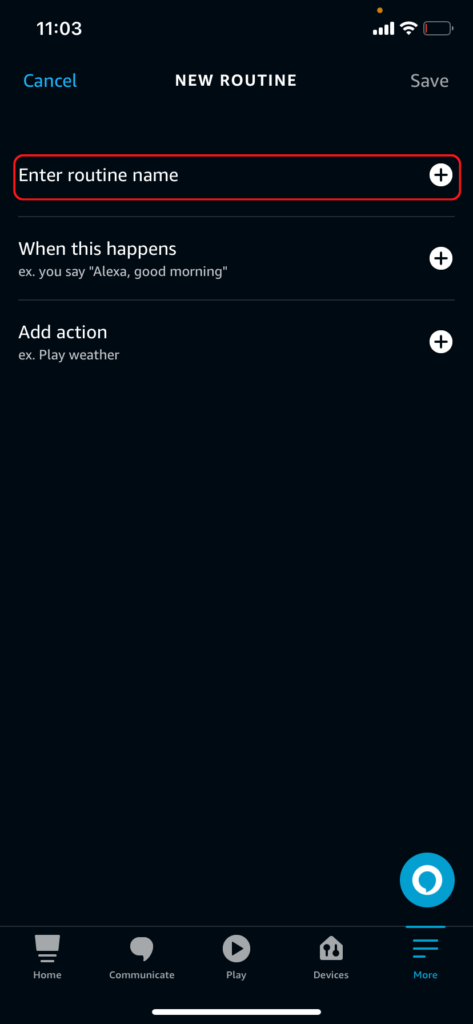
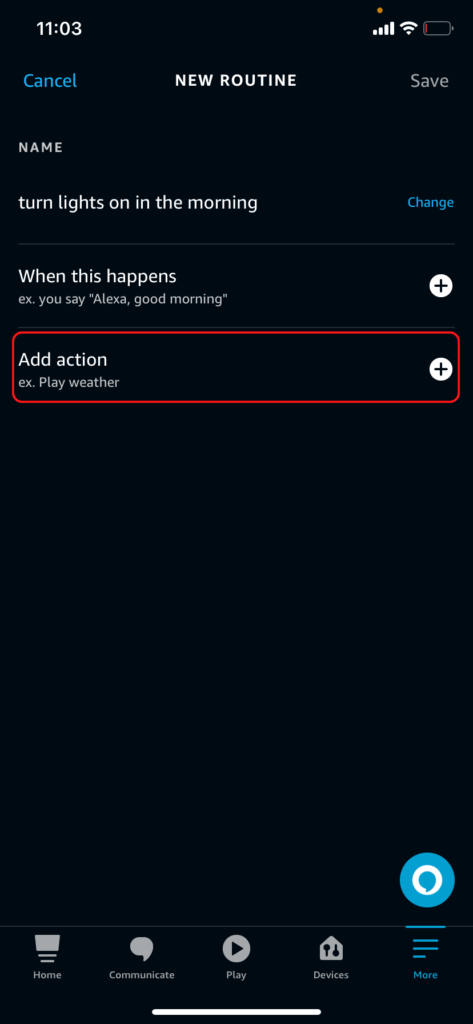
- Click the add new routine icon, the ‘+’ in the upper-right corner of the screen.
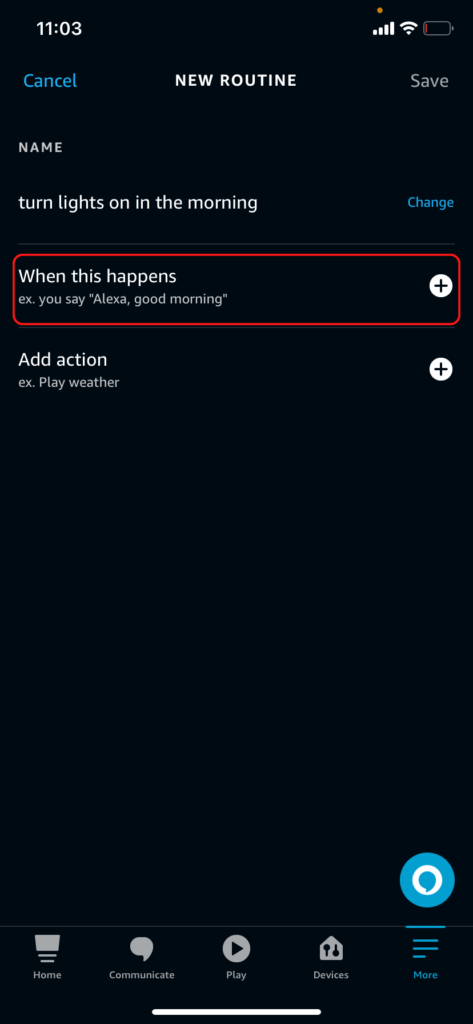
- Click Enter routine name and give it a name you’ll remember, something like “Turn lights on in the morning.” Then click Next to get back to the New Routine screen.
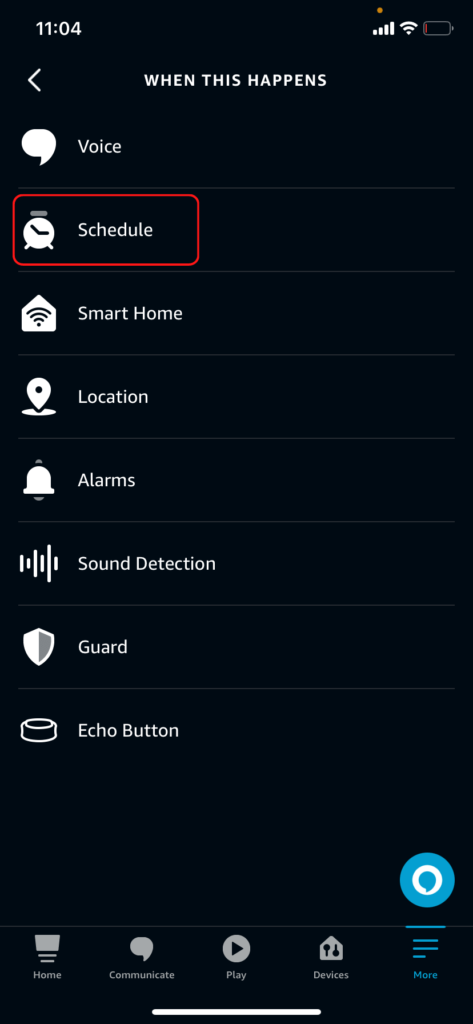
- Click When this happens.
- Select Schedule then At Time.
- Set which days you want the lights to turn on and at what time. If you want the lights to come on at different times on some days, you’ll need to create separate routines for that.
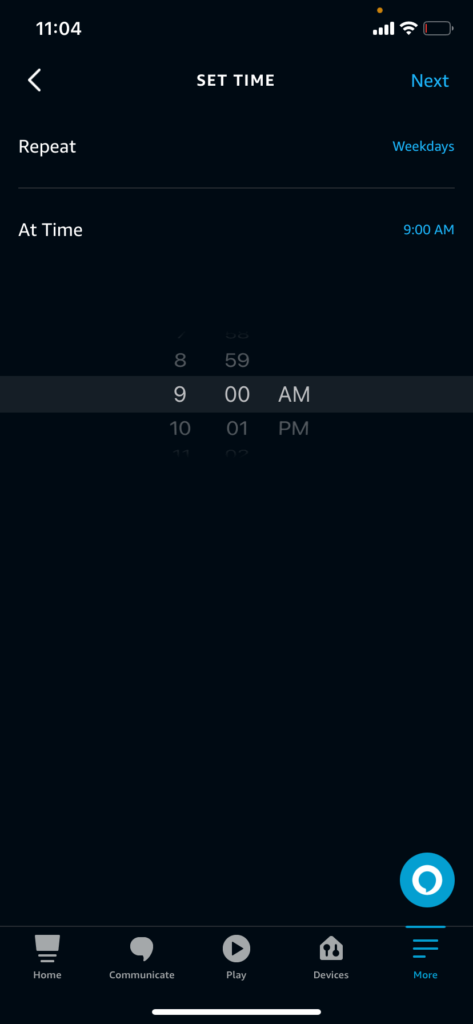
- Click Next to get back to the New Routine screen.
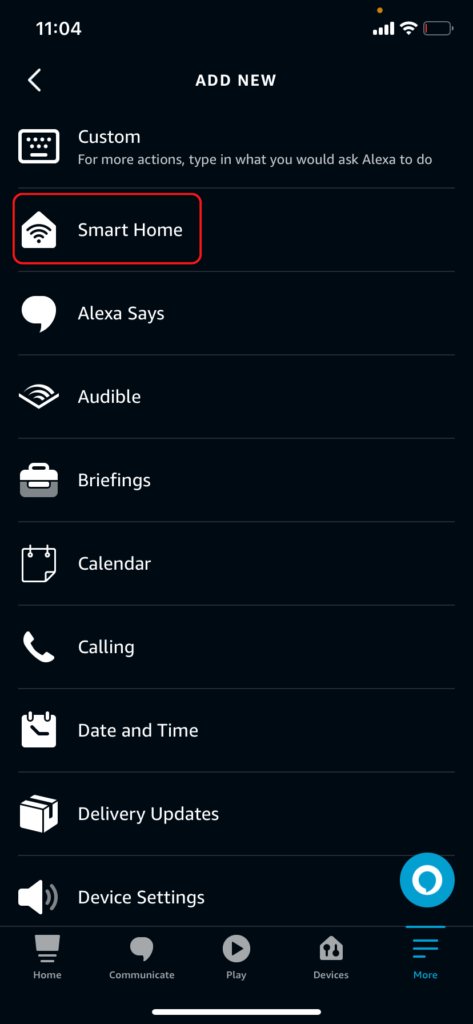
- Click Add action.
- Click Smart Home then Lights (or Groups to schedule a group of lights).
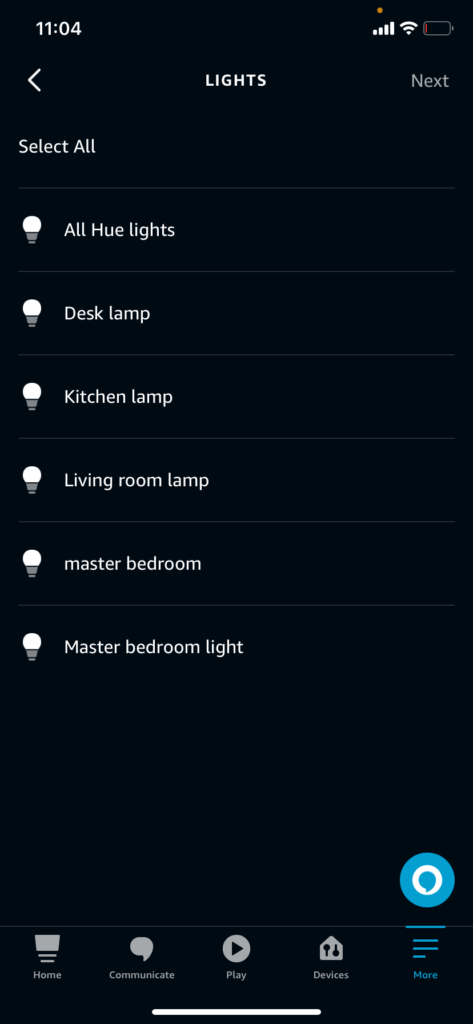
- Select the light (or group of lights) that you want to schedule. If you selected a group, you’ll need to select Lights on the next screen.
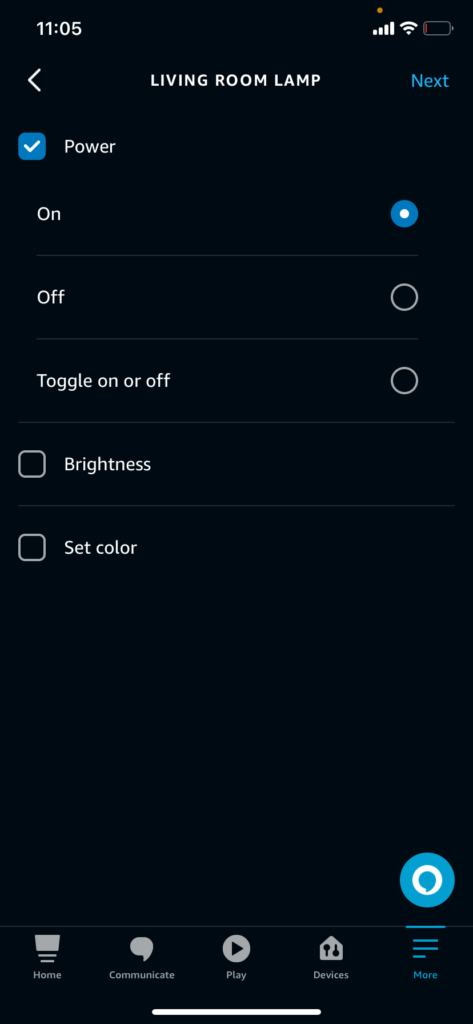
- Select Power then On. You can optionally choose a brightness level or color for some light bulbs. Then Click Next.
- Click Save to finish creating the routine.

You can use a similar process to schedule your lights to turn off. You can also add additional actions to these routines, in case you want to play music or activate any smart appliances alongside your lights.
Other Scheduling options
Turn lights on or off at sunset or sundown
In the Schedule screen, you may have noticed options for Sunset and Sundown. These offer a great alternative to set times for lighting schedules. For example, you could have your living area lights turn on when the sun goes down.
The sunset and sundown menus also offer an offset option, so you can have your lights turn on or off up to 60 minutes before or after the sun comes up (or goes down).
Turn lights on with your alarm
There are other trigger options if a scheduled time doesn’t fit your needs. One of my favorites is setting the lights to turn on when my alarm goes off.
Since I use dimmable Hue lights, I can even have the lights turn on at low brightness and gradually increase in intensity. I do that by creating a single routine with multiple lighting actions separated by delay actions.
Turn off lights when you leave home
The Location trigger options can be used to turn lights off when you leave home or turn them on when you come home. You’ll need to activate location services on your phone for this to work.
Turn lights on when you enter a room
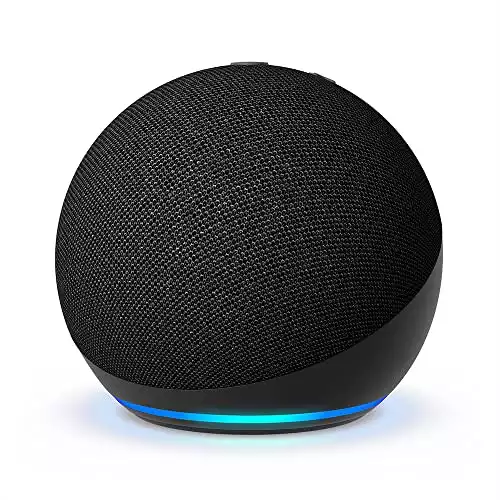
Recently, Amazon added the ability for Echo to detect when someone is in a room. Echo and Echo Dot devices do this through ultrasound, whereas Echo Shows do it using their camera.
Each of these has its own limitations. Both work decently in small rooms. The Echo Show can’t detect motion if its privacy shield is in use or if the camera doesn’t have a direct line of sight to the room occupant. And the Echo and Echo Dot can’t detect you if you aren’t moving.
You can find the occupancy actions under the Smart Home triggers. Select your Echo device from that list and select the Occupancy option. Only the following Echo models will appear in the list:
- Echo (4th gen or later)
- Echo Dot (4th gen or later)
- Echo Show 5 (2nd gen or later)
- Echo Show 8 (2nd gen or later)
- Echo Show 10 (3rd gen or later)
- Echo Show 15
What’s Next?
With the right smart bulbs, you can go way beyond simple scheduling. Philips Hue’s Dynamic Scenes are a great way to change the mood of your apartment. And with multiple hue Bridges, there’s virtually no limit to how much of your home lighting you can replace with smart lighting.
Part of the reason I suggest WiZ lights as a budget option is that they are owned by the same parent company as Hue. While there are some significant differences between Wiz and Hue, Wiz bulbs are easy to integrate into a Hue setup if you decide to upgrade later.
|
|
|
|
N/A
|
$34.99
|
$49.99
|

Zachary has spent 12 hears in the tech industry focusing on automation, analytics, and cybersecurity. His passion is tech education; he uses his industry expertise and STEM PhD to break down complicated concepts into simple step-by-step guides. When he’s not writing or coding, you can find him binging anything Star Trek or Marvel or reading far too many sci-fi novels.